Monday, July 27, 2015

Instant Uthappam (Indian Pancakes With Veggies)

Uthappams are reminiscent of a pizza minus the cheese and no gluten since only rice and besan (garbanzo flour) are used. They are wonderfully flavorful pancakes; traditionally Uthappams are made with Dosa or Idli batter. So, what does one do if there is no leftover batter? I made these wonderful Uthappams with a fresh batter using flours which worked very well.

Rice flour, garbanzo flour, asafetida, etc are readily available in Indian markets.

Uthappam With Dal Chutney 
Uthappams are very popular for brunch. They may be eaten any time of day although not typically for breakfast. Serve them with one of more of your favorite chutneys - Dal, coconut, sweet potato, or bell pepperSambar and raitas are popular accompaniments also.

Ingredients:

Topping:
1 Carrot, shredded
1 small Onion, any color, finely chopped
1 small Bell Pepper,any color, finely diced
1 small Zucchini, shredded
1 ripe Tomato, thinly sliced
1-2 Hot green Chiles, minced
1 small bunch Cilantro, chopped

Veggies for Topping
Veggies mixed & ready 
Batter:
1 cup Rice flour
1 cup Besan
1 pinch Asafetida
1 pinch Turmeric
1 tsp Kosher or Sea Salt
Oil for cooking

Method:

Mix the flours with salt and spices. Add enough water to make a not too thick or thin batter. If you have a little time, add a pinch of yeast to the batter, stir well, and set aside. If you need the batter right away, add a pinch of baking soda instead and stir well.

Prepare the veggies and combine in a bowl.

Now you have a choice to make: 1. mix everything together or 2. keep the veggies as topping. Either way, the pancakes are delicious.

Heat a skillet over medium heat; lightly coat a little oil with a paper towel (be careful to not burn your fingers).

Spread about 1/2 to 3/4 cup of the batter on the skillet, drizzle a few drops of oil all around it, and quickly sprinkle some of the toppings on top of the pancake. You may use a lid to make sure everything cooks well.

Flip the pancake carefully so as not to displace the toppings. Remove to a plate.

Proceed with the rest of the batter to make more uthappams. Any leftover batter may be saved in the fridge for a couple of days.

Serve hot off the griddle or warm with the suggested or your favorite chutneys and a raita if you like.

Enjoy!!
Cooking the Uthappam
Variation: If it is too much of a bother to keep the topping separate, just go ahead and combine the toppings with the batter and proceed with cooking the uthappams. They will be fine and taste great; just a different look :). I added red cabbage to the list of toppings here.

With the addition of veggies stirred into the batter, the uthappams are often thick; in order to cook better, I make a little hole in the middle and drizzle a little oil while cooking.

Batter with Toppings mixed in
Uthappam all ready to plate

Friday, July 24, 2015

Creamy Cilantro Dip & Dressing


Creamy Cilantro Dressing
Needless to say that we adore this dressing :-) ~ since I keep making quantities of it often! It goes well with green salads with lots of crunchy veggies; our favorite is with main salad meals - the Mexican themed Fiesta Salad for an example. I make a large jar of it and it lasts for a few days of pleasure. It is great as a dip for fresh veggies or as a topping for home-made nachos too.

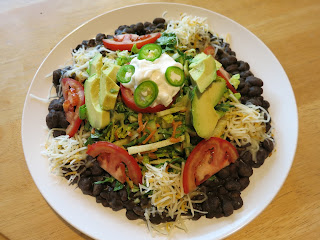
Fiesta Salad with Frijoles De La Olla
I add a small piece of apple instead of the typical addition of sugar which mellows the bite as well as for a subtle sweetness. Remove and discard cores from chiles if you like the dressing to be mild; if you like it spicy, leave cores in or add more chiles - adjust as you like. The nuts not only give the dressing creaminess, they also add to the body. Feel free to adjust the various ingredients to suit your own taste and requirements; but do try making it.

Pick the key limes that are a little golden (indication of maturity - I think the mature limes are more flavorful than the hard green ones) and heavy for their size; the heavier they are, the juicier they will be!

Although not a requirement, a high speed blender makes it a breeze; traditional or hand blenders will work fine too. 

Makes about 1 cup (Dressing will stay fresh for about a week)

Ingredients:

1 bunch Fresh Cilantro/Coriander
1-3 Fresh Serrano/Jalapeno chiles, stemmed and cored
1-2 cloves fresh Garlic
1 slice fresh Onion
1/2 small apple, cored
1/4 cup Pumpkin Seeds, Cashews, Almonds, or Peanuts
1 tsp Sea Salt
Freshly ground Black Pepper
2 Tbsp Extra Virgin Olive Oil

2-3 Key Limes, juiced
Water, as required

Method:

If the seeds or nuts are raw, the two options are to use them raw or toasted. If raw, soaking them for a couple of hours or up to overnight will be beneficial. They may be purchased already roasted or roasted at home in the oven or in a dry skillet - either way it should take a few minutes.

Wash and drain the herbs, chiles, garlic, etc. Trim chiles, peel garlic; keep most of the stems of cilantro - just trim the stem ends.

Place the first nine of the ingredients in the carafe of a blender; add half the lime juice and just a couple of tablespoons of water.

Process the dressing until finely pureed and pulverized into a smooth dressing. Scrape down the sides of the carafe with a rubber spatula. Add a little more water as required to facilitate blending.

Taste; adjust the taste with more lime juice, salt, etc.

Pour dressing into a clean glass jar; swirl the carafe with a couple of tablespoons of water to gather up every bit of the dressing and pour into the jar.

Stir well, and thin more with water if necessary.

Taste and adjust with more lime juice or salt as needed.

Drizzle on the salad and mix well.

Eat and Enjoy!!

Creamy Cilantro Dressing With Salad

Thursday, July 23, 2015

Multi-Grain Spiced Kichdi (Multi-Grain Risotto With Indian Spices)

I love this well-spiced Masala Kichdi with assorted grains and lentils - it is hearty as it is delicious and I could eat it every day! It is fragrantly spiced but not hot and is suitable for children as well. When serving you may want to remove the chiles to avoid a child or someone unfamiliar with Indian food getting an unpleasant surprise! Although the chiles give a wonderful aroma to the food, they are not meant to be eaten.

Obviously you don't absolutely have to have so many different kinds of grains and lentils to make it wonderful; just a couple each will do just fine; the basic proportions are 1 part grain to 1, 2, or 3 parts legumes (dals) - use whatever combinations beguile you. I wanted to see how many different kinds I could put in; Red, Black, or Arborio rice and Amaranth are a couple of more possible additions.

I prepare the Kichdi in the pressure cooker. Prepare the seasonings and add to the cooker and proceed according to manufacturer's directions on using the pressure cooker. I always make this amount or more as kichdi stays fresh for about a week and freezes well. It thickens upon cooling; add a little hot water to thin as required.
Multigrain Kichdi
Ingredients:

Kichdi Mix: Combine the following grains and legumes and keep them in a jar. When you want to make kichdi, you just have to measure it out! 1/8 cup each Assorted Grains: Barley, Brown Rice, Quinoa, Steel cut Oats, Cracked Wheat, Farro, etc. 1/8 cup each Assorted Lentils/Legumes: yellow Toor Dal or split peas, split Mung Dal  (with/without skin), Chana Dal, Masoor Dal (red lentils), Red Chori/Black-eyed Peas, etc. You may use as few or as many types of the grains and beans. There should be either 1:1, 1:2, or 1:3 ratio of lentils/beans to grains - I tend to use a 1:1 or 1:2 ratio, our family likes the taste and texture that more legumes add to the kichdi!

Kichdi Mix With Assorted Grains and Dals
 2 cups Kichdi Mix
1 Tbsp Coconut Oil
1 piece 2" Cinnamon Stick
7-8 Cloves
2 Cardamoms (optional)
5 Dry Red Chiles
1/2 tsp EACH - Cumin and Fennel Seeds
2 Tbsp grated fresh Ginger
1 pinch Asafetida/Hing
1 stem fresh Curry Leaves
1/2 tsp Turmeric
1-2 tsp Sea Salt
Earth Balance (vegan Butter substitute) to serve
Raita,  Beet Salad, Chutneys, Pickles, Papadams, etc to serve

Method:

Soak the kichdi mix in a bowl with plenty of water to cover; let soak for half an hour. If you prefer to cook right away, soaking is not absolutely necessary - although soaking may have the benefit of hydrating, ridding any undesirable elements like arsenic and phytic acid as well as helping to cook  a little faster.)

Rinse and drain well; have 5 to 7 cups of water ready; adding more water makes for a soft kichdi (like that pictured) .

Heat the oil over medium heat in a large dutch oven or pot and add cinnamon stick, cloves, cardamoms, and red chiles; reduce the heat to low, add the cumin and fennel and stir well and cook until spices brown a little and are fragrant.

Stir in ginger, curry leaves and asafetida carefully; cook for a few seconds.

Tip the grains in and then the water carefully into the pot.

Add turmeric and salt; stir well and bring to a boil.

Reduce heat and simmer slightly covered stirring occasionally until all the lentils are soft (about 40 minutes) adding a little hot water as necessary. Let rest covered for 10 minutes.

The kichdi should be soft and creamy but not soupy.

Serve hot with a pat of Earth Balance if you like. Kichdi is traditionally served with raita, pickles and papadams. A chopped salad may be served instead of the raita.

Enjoy!!
Masala Kichdi

Saturday, July 11, 2015

Frijoles De La Olla (Flavorful Bean Stew)

This simple but rib-sticking stew, is made with various beans in different parts of Mexico; although different, they are seriously yummy. We often think of pinto beans as the traditional frijoles; but other beans such as black, kidney, and Peruano are also used; I have seen some cooks mix pinto and kidney beans for a colorful dish. Whichever beans you use, it is sure to become a favorite!

Onions, a bit of garlic, fresh or dried chiles, a splash of oil or a pat of butter, etc may be added to the olla (cooking pot) depending on the individual cook. Some people cook the beans with the chopped onions and garlic which cook and melt into the beans without a trace. One woman told me that she cooks the onions in oil until they are practically black, strains out the onions, and adds the oil to the beans for the best flavored beans! Though I have tried the various recipes (not the blackened onion though) and enjoyed them all,  from the simplest - which is just plain beans cooked with a chile or two, and a little salt, to beans cooked with onions and garlic sauteed in a little splash of oil.

Frijoles De La Olla is very useful to have on hand; I like to cook a great big batch of beans to use in various recipes during the week as well as freeze a few portions for a 'rainy' day! Besides being delicious on their own, Seven Layer Dip, Mexican Lasagna, Tortilla soup, and Enfrijoladas are just a few of the recipes that could be prepared utilizing these beans. If you mash up the beans, you will have something like  Frijoles Mexicana or soft beans perfect for heaping on Tostadas or rolling up in burritos. I often serve them as part of a "one-plate meal" salad.

The way these beans disappear, it is probably good to make a double or triple batch to make sure everybody gets their fair share :)! This recipe may be doubled or tripled - just make sure you use a large enough cooking pan to accommodate the larger amount of beans. Soaking is not strictly necessary but cuts down on cooking time and may aid digestibility. As always, pressure cooking the beans significantly helps to cut down on cooking time as well as fuel.

Black Bean Frijoles With Salad
8 Servings

Ingredients:

2 cups Pinto, Black or Peruano Beans
1 - 2 Dried/fresh hot chile
1 Onion, finely chopped
1-2 cloves fresh Garlic, minced
1 - 2 Tbsp good Olive Oil
1/2 tsp Turmeric
1 tsp Smoked Paprika (optional)
1 tsp Sea Salt or to taste

Toppings for serving:
Salsa of your choice
Avocado cubes
Non-dairy Sour Cream
Non-dairy Cheese
Chopped onions
Cilantro
Romaine lettuce
Pickled Vegetables

Method:

Clean and sort the beans, rinse, cover with plenty of fresh water and let soak overnight.

Drain the beans, rinse and add enough fresh water to cover the beans by about an inch. Add the whole chiles on top.

Bring to a boil and reduce heat so the beans are simmering gently; cook until soft stirring occasionally. Add boiling water as necessary if the beans dry out. The beans may be pressure cooked also. When the beans are done, fish out the chiles and discard.

While the beans are cooking, prepare the onion and garlic.

Heat the oil in a large pan and cook the onions and garlic with a pinch of salt and turmeric stirring often until golden.

Stir in the paprika, and cook for another minute.

Tip the spice-onion mix into the beans and simmer for at least 30 minutes; they could be simmered up to 1 hour or so. Just make sure to stir occasionally and add hot water as necessary.

Serve hot or warm with your favorite toppings.

Any leftovers may be stored in the fridge or in the freezer for longer storage.

Enjoy!!

Tuesday, July 7, 2015

Kale Bhel Salad (Green Salad with an Indian Twist!)

As you may have already guessed, we are crazy for salads these days! So to make the everyday salads exciting, I make them with a different international flair each day. :) (Check out the Pad Thai Salad) The nice thing about all these salads are that you can prep them ahead of time and assemble at the last minute. 

Kale Bhel salad is as tasty as it is healthy (mostly :-}) with a little addition of Bhel Puri Mix - an Indian snack mix readily available in Indian markets! Any crunchy veggie may be used in this salad. For the dressing, mix fresh lime juice with some green and sweet chutneys. Other greens also may be used in this salad. For a mild salad, remove the core from the hot chile or omit it altogether; if you like it spicy, leave the core and seeds in and/or use more chiles.

Our family loves this salad; when I made the traditional Bhel Puri, it was not difficult to add a few more greens and veggies to make it healthier. If the little addition of the Bhel Mix helps everyone to love a salad and eat more of it, the more power to it!

Green and Sweet chutneys, Bhel mix, etc are available in Indian Markets. You can use Indian brown chick peas or garbanzos; these may be home cooked or canned.

Kale Bhel Salad


4 Servings

Ingredients:

4-6 oz Baby Kale
4-5 leaves Romaine Lettuce
1 wedge Red Cabbage
1 small Red Onion
1 large Carrot
1 Turnip/Jicama
1 medium Cucumber/Zucchini
1 bunch Cilantro
1 Hot green Chile (like Jalapeno or Serrano) (optional)
1 cup cooked Chick Peas, drained
1/4 cup Roasted Peanuts
1 cup Bhel Puri Mix + a little extra for topping
Lime wedges

Dressing:
1/4 cup fresh Lime juice
1/4 cup Each, GreenSweet Chutneys

Method:

Wash and trim all the veggies. Thinly slice the kale, romaine, and cabbage into a chiffonade. Thinly slice and chop the red onion. Place in a large bowl.

Grate/shred the carrot and turnip/jicama; add to the bowl. If you prefer, these may be chopped too. I like the different textures of chopped, shredded/grated, etc.

Finely dice the cucumber, finely chop the cilantro, and core and mince the hot chile. Add all the veggies to the bowl.

Combine the dressing ingredients and taste; it should be strong tasting - when mixed with the salad, it will be just right.

When ready to serve the salad, mix the prepared veggies with the chick peas, peanuts, Bhel mix, and half the dressing. Mix only what will be eaten as the salad will get soggy if left too long.

Divide the salad among the serving plates or bowls, top with a spoonful of the Bhel mix, and serve immediately. Pass the extra dressing and the lime wedges to squeeze as desired.

Eat & Enjoy!!

Monday, July 6, 2015

Pad Thai Salad (Raw Veggie Noodles With Peanut Dressing)

A fabulous salad to turn anyone into a salad lover! The sinuous vegetable noodles add color and crunch to this amazing dish. Once the prep is done, store everything in the fridge until serving time; a wonderful make-ahead dish. Although the tofu may be added without any cooking, my family loves well-flavored tofu; so I saute small pieces of it with red pepper, ginger and garlic.

I used an inexpensive peeler-like shredder that I got from a Japanese market. But one may use a regular peeler, a mandoline slicer, a spiralizer, or just a plain old sharp knife.

I used the vegetables on hand but other veggies may be used as preferred. Chinese pea pods or sugar snap peas, baby bok choi, napa or green cabbage, tender kale, bell pepper, etc may be used.

Veggie Noodles


Veggie Noodles With Lime, Dressing, and Tofu
4 - 6 Servings

Ingredients:

1 Medium Zucchini
1 Large Carrot
1 Daikon Radish or a piece of Jicama
Small Slice of Red Cabbage
1 cup Bean Sprouts
1 bunch Green Onions
1 small handful Thai or Regular Sweet Basil
1 bunch fresh Cilantro
1 block firm Tofu (14 - 16 oz)
2 Tbsp Each, Toasted Black Sesame seeds and chopped Peanuts

Peanut Dressing

1 tsp Hot Pepper flakes
1 Tbsp Brown OR Coconut Sugar
1/4 cup Peanut Butter (crunchy or smooth)
1-2 Large Limes, juiced
1 Tbsp Braggs Liquid Aminos OR Soy Sauce
1 Tbsp Tamari/Soy Sauce
1 Tbsp finely grated fresh Ginger
1 clove fresh Garlic, finely minced
Water as needed

Method:

If you are cooking the tofu, cut into small pieces and cook with a little oil and a pinch of salt until they begin to brown a little. Stir in 1 clove minced garlic,1 Tbsp grated ginger and a pinch of hot pepper flakes. Cook on low heat turning often but gently until the tofu pieces are browned a little more. Set aside.

Prepare the dressing: combine all the ingredients in a jar. If liquid aminos is not available, increase the soy sauce to 2 Tbsp. Add half the lime juice first and taste the dressing; add more as needed. Thin the dressing with water but keep it a bit thick. Refrigerate until needed.

Wash, trim, and prep all the veggies & herbs:

Shred the zucchini, carrot, radish/jicama into noodles or cut into thin pieces.

Thinly slice the red cabbage.

Trim the root ends off the bean sprouts.

Thinly slice the green onions (both the white and green parts) on the diagonal.

Chop the basil and cilantro.

Place all the prepped veggies and herbs in a large bowl.

Assembly: Mix only as much of the salad as will be eaten right away. If left standing the salad will get soggy as the salt in the dressing draws out moisture from the veggies. Add enough dressing to moisten and coat the salad well. 

Mix the tofu into the salad or serve separately.

Spoon into individual bowls or plates and top with toasted sesame and peanuts.

Pass lime wedges to squeeze on top and more of the dressing as desired.

Eat! Enjoy!! 

Pad Thai Salad Ready to Eat!